Cut/copy/paste data
Use basic clipboard operations
To cut, copy and paste data in the current spreadsheet make use of the right-click menu or use the corresponding icons available on any tab of the top toolbar,
-
Cut: select data and use the Cutoption from the right-click menu to delete the selected data and send them to the computer clipboard memory. The cut data can be later inserted to another place in the same spreadsheet.
-
Copy: select data and either use the Copy
 CopyThe copied data can be later inserted to another place in the same spreadsheet.
 -
Paste: select a place and either use the Paste
 The data can be previously copied from the same spreadsheet.
In theversion, the following key combinations are only used to copy or paste data from/into another spreadsheet or some other program,in theversion, both the corresponding buttons/menu options and key combinations can be used for any copy/paste operations:
-
Ctrl+X key combination for cutting;
-
Ctrl+C key combination for copying;
-
Ctrl+V key combination for pasting.
Note: instead of cutting and pasting data within the same worksheet you can select the required cell/cell range, hover the mouse cursor over the selection border so that it turns into the Arrow  icon and drag and drop the selection to the necessary position.
Use the Paste Special feature
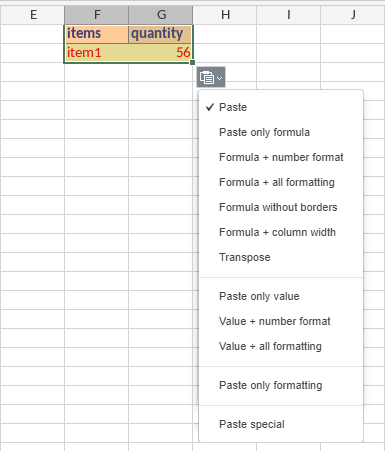
Once the copied data is pasted, the Paste Special  button appears next to the lower right corner of the inserted cell/cell range. Click this button to select the necessary paste option.
When pasting a cell/cell range with formatted data, the following options are available:
-
Paste: allows you to paste all the cell contents including data formatting. This option is selected by default.
-
The following options can be used if the copied data contains formulas:
-
Paste only formula: allows you to paste formulas without pasting the data formatting.
-
Formula + number format: allows you to paste formulas with the formatting applied to numbers.
-
Formula + all formatting: allows you to paste formulas with all the data formatting.
-
Formula without borders: allows you to paste formulas with all the data formatting except the cell borders.
-
Formula + column width: allows you to paste formulas with all the data formatting and set the source column's width for the cell range.
-
Transpose: allows you to paste data switching them from columns to rows, or vice versa. This option is available for regular data ranges, but not for formatted tables.
-
-
The following options allow you to paste the result that the copied formula returns without pasting the formula itself:
-
Paste only value: allows you to paste the formula results without pasting the data formatting.
-
Value + number format: allows to paste the formula results with the formatting applied to numbers.
-
Value + all formatting: allows you to paste the formula results with all the data formatting.
-
-
Paste only formatting: allows you to paste the cell formatting only without pasting the cell contents.
- Paste
-
Formulas - allows you to paste formulas without pasting the data formatting.
-
Values: allows you to paste the formula results without pasting the data formatting.
-
Formats: allows you to apply the formatting of the copied area.
-
Comments: allows you to add comments of the copied area.
-
Column widths: allows you to set certal column widths of the copied area.
-
All except borders: allows you to paste formulas, formula results with all its formatting except borders.
-
Formulas & formatting: allows you to paste formulas and apply formatting on them from the copied area.
-
Formulas & column widths: allows you to paste formulas and set certaln column widths of the copied area.
-
Formulas & number formulas: allows you to paste formulas and number formulas.
-
Values & number formats: allows you to paste formula results and apply the numbers formatting of the copied area.
-
Values & formatting: allows you to paste formula results and apply the formatting of the copied area.
-
- Operation
-
Add: allows you to automatically add numeric values in each inserted cell.
-
Subtract: allows you to automatically subtract numeric values in each inserted cell.
-
Multiply: allows you to automatically multiply numeric values in each inserted cell.
-
Divide: allows you to automatically divide numeric values in each inserted cell.
-
Transpose: allows you to paste data switching them from columns to rows, or vice versa.
-
Skip blanks: allows you to skip pasting empty cells and their formatting.

When pasting the contents of a single cell or some text within autoshapes, the following options are available:
-
Source formatting: allows you to keep the source formatting of the copied data.
-
Destination formatting: allows you to apply the formatting that is already used for the cell/autoshape where the data are to be iserted to.
Paste delimited text
When pasting delimited text copied from a .txt file, the following options are available:
Warning: The delimited text can contain several records, and each record corresponds to a single table row. Each record can contain several text values separated with a delimiter (such as a comma, semicolon, colon, tab, space or other characters). The file should be saved as a plain text .txt file.
-
Keep text only: allows you to paste text values into a single column where each cell contents corresponds to a row in the source text file.
-
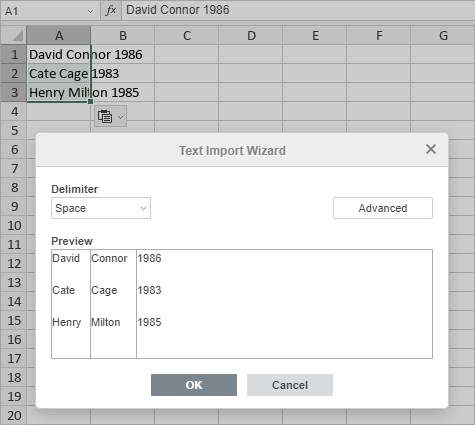
Use text import wizard: allows you to open thewhich helps to easily split the text values into multiple columns where each text value separated by a delimiter will be placed into a separate cell.
When the Text Import Wizard window opens, select the text delimiter used in the delimited data from thedrop-down list. The data split into columns will be displayed in the Preview field below. If you are satisfied with the result, press the OK button.
If you pasted delimited data from a source that is not a plain text file (e.g. text copied from a web page etc.), or if you applied the Keep text only feature and now want to split the data from a single column into several columns, you can use the Text to Columns option.
To split data into multiple columns:
-
Select the necessary cell or column that contains data with delimiters.
-
Switch to the Data tab.
-
Click the Text to columns button on the top toolbar. The Text to Columns Wizard opens.
-
In the Delimiter drop-down list, select the delimiter used in the delimited data.
-
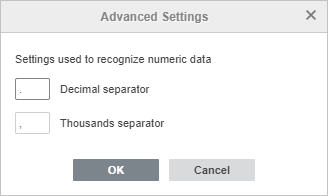
Click the Advanced button to open the Advanced Settings window in which you can specify the Decimal and Thousands separators.
-
Preview the result in the field below and click OK.
Use the Auto Fill option
To quickly fill multiple cells with the same data use theoption:
-
select a cell/cell range containing the required data,
-
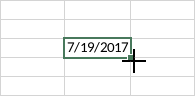
move the mouse cursor over the fill handle in the right lower corner of the cell. The cursor will turn into the black cross:
-
drag the handle over the adjacent cells to fill them with the selected data.
Note: if you need to create a series of numbers (such as 1, 2, 3, 4...; 2, 4, 6, 8... etc.) or dates, you can enter at least two starting values and quickly extend the series selecting these cells and dragging the fill handle.
Fill cells in the column with text values
If a column in your spreadsheet contains some text values, you can easily replace any value within this column or fill the next blank cell selecting one of already existing text values.
Right-click the necessary cell and choose the Select from drop-down list option in the contextual menu.
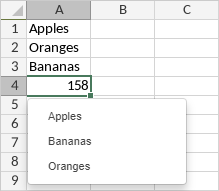
Select one of the available text values to replace the current one or fill an empty cell.

